I never would have came up with these designs on my own, but I think they turned out cool. I just wish I would have took pictures of the other shirts. Next time. Have a great afternoon.
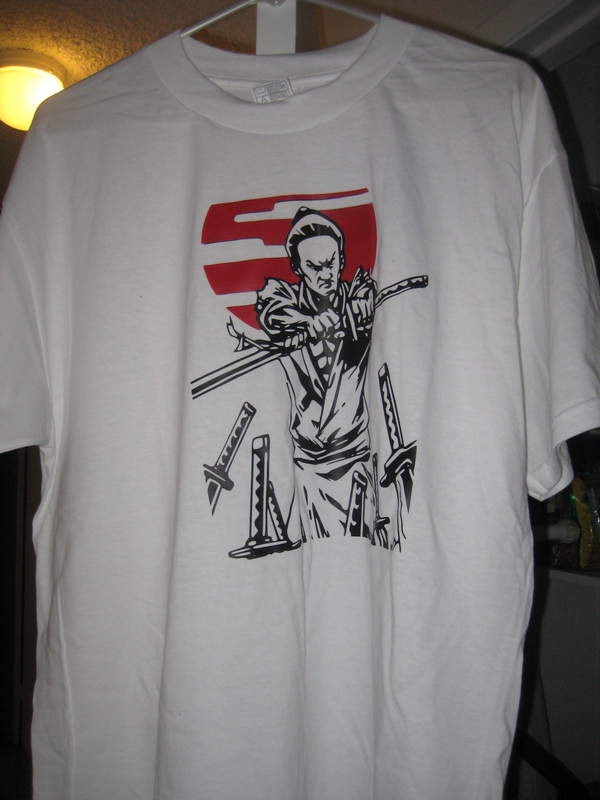
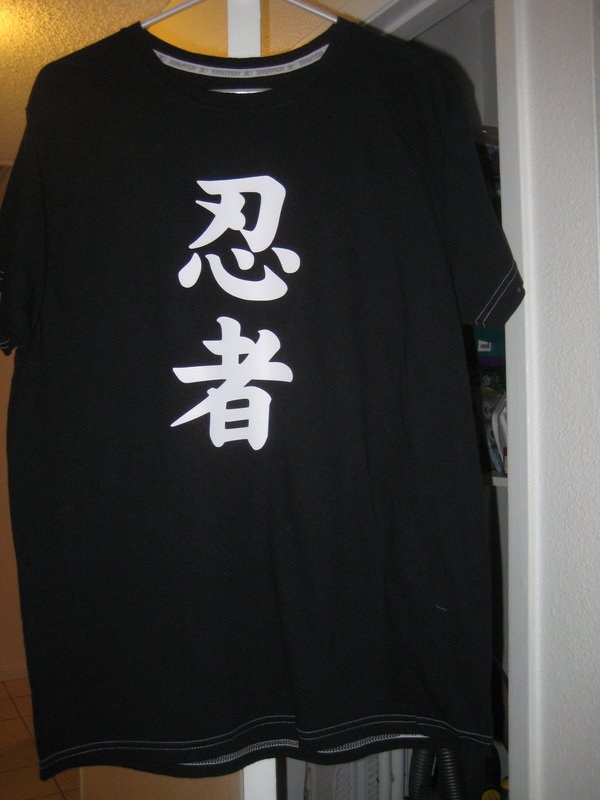
My darling husband has been one of the biggest promoters for my shop. Recently he wanted to go to Wonder Con---a comic book convention in Anaheim. He told his friends he couldn't afford it because I wasn't working. His friends asked him how many shirts would they have to buy so that he could go. He told them they'd have to buy 5 shirts. So they did. They sent me some .jpeg files and I cut the designs out of heat transfer vinyl and they are now the proud owners of some shirts I made for them. The first picture is of a Samurai and I used 2 colors for the picture. The bottom shirt is some Chinese lettering that they said means dragon--not sure if it is right or not, but they seemed to like it.
I never would have came up with these designs on my own, but I think they turned out cool. I just wish I would have took pictures of the other shirts. Next time. Have a great afternoon.
0 Comments
One of the ladies saw the wedding favor boxes I made and wanted them for her friend's bridal shower. She just wanted the colors changed to white with a pink ribbon on half and a black ribbon on the other half. She wanted it done on sparkly white paper, but they didn't have enough of that kind of paper at the store. I told her that I could emboss a design on white card stock and the result is so cool. The embossing file was a little bit too short, but it worked out because it looks like it was intentional. The embossing stops right at the waist line so it looks like I actually did it on purpose. With the ribbon there it covers the crease. I had fun using my epic 6 to emboss this with 2 cricut embossing folders. I cut out he image out with the make the cut software on my cricut machine. I had to use the blackout feature to get the program to stop double cutting the image and cutting off the tabs. After cutting out the image, I embossed it, then folded it and taped the tabs up and used a glue gun to attach the ribbon. I think it turned out super cute and so did my customer. Have a great week and remember to keep it crafty. Happy Thursday to you. Just found out yesterday that I got the job as a behavior therapist. It's part time, so I will still have time to do my crafts...yea!!! I just had to share this word book with you. One of my customers saw the wordbook on Etsy and wanted one, but was kinda bummed because the name she wanted was only 4 letters. I did some brain storming with her and this is what we came up with. The family likes monkeys, so I added a monkey to the word book, I incoroprated the family's last name on the book, and I added an extra page to give the book a more finished look. I love the way it came out. I've always liked how the browns and the blues go together. Surprisingly, she contacted me on Tuesday and I had it finished this morning and mailed it off this afternoon. I thought it was going to take a lot longer...especially since the design studio software conked out on me and I had to cut some of it out by hand---grrrrr. But all is well and I think she is really going to enjoy this and it will make a really nice keepsake. Have a great afternoon and remember to make lasting impressions through crafts!!! Today I decided to build a photo box. I thought I could take better pictures of all my items if I had a place to display them better. I ended up learning a lot more about taking pictures in the process. Basically I had a big box that was about 18x22 and 3 inches deep. I lined it with white paper. I had some flood lights that I used on my tent display at night an attached it to the box. I took a couple of pictures. They came out better than some of my other pictures, but I didn't like the yellowish tint. I googled how to improve the pictures. The sight I went to said that you need to adjust the white balance on the camera. I tried to figure it out, but these digital cameras are hard to figure out where anything is. So I ended up just using a clothes pin to pin a piece over white paper over the light so it would filter out the yellow light. The pictures are much better than they were. The best ones are the ones I took in natural light when I'm at the actual craft show. I guess I'm just going to have to take my box outside. But this set up will work when it is raining or when the sun goes down. Check out some of the photos I took when I was playing around with this new Photo Box thina-a-ma-bopper. Hi there...see I told you I would come back. I've decided to make Friday nights the night that I update the blog. It's a good night to recap the week with no interruptions. So this week, I had a few orders to make some shirts for a gal that was planning a bachelorette party with the bridesmaids and of course with the bride. She wanted to get 7 shirts, 7 favor boxes, and a banner put together all before the first weekend of March. Kinda of short notice, but I'm unemployed, so I have nothing better to do. So on Tuesday she gives me a brief description of what she's looking for. I Wednesday I go out and buy the supplies. Wednesday night she confirms what she wants, boom---Thursday I'm done making the shirts for her by noon. Still waiting for confirmation about colors for the banner. Thursday I go and babysit my friends kids until 8pm. They love the shirts, and confirm the colors for the banner. Friday morning I go to a job fair. I get back by 1pm and I'm done making the banner around 3 or 4. It felt really good to get this whole order done in a couple of days. She needed it in her hands by next Thursday, but I can get it mailed out 5 days ahead of schedule as soon as I recieve payment. One of the best things about custom ordering from any small business, is the amount of attention to detail and the high level of customer care that comes from real people trying to do a great job to make ends meet. I'm glad that I can help my customers make lasting impressions through crafts. I still find it a privelage that people actually want to pay for the stuff that I make in my spare time. I'm glad that I can help people set the tone to make great memories by adding the finishing touches that can't be bought at Party City, Target, or Walmart. There is just something so special about the little extra personal touches that come through crafts that just can't be found in a store. It just says I cared enough to take the time to go out of my way to make your day even more special. It means even more nowadays because everyone is so busy. Taking the time to make and/or support people that make handmade items is truly an investment in your friendships because it shows that you cared enough to invest time to make the event extra ordinary. It has been over a year since I've posted something. I've been MIA due to a job that recently came to an end. I never stopped crafting, I just didn't keep updating this website. But that is going to change. I have a lot of new items to show you and I've already made quite a few changes and improvements to this website. So here are some of the new onesies that I've been making and meaning to put up on this website. Most people stop by my craft booth and leave laughing. Some will actually buy something, but most people just laugh. I hope these baby clothes will put a smile on your face today. BTW For all you non-Spanish speakers, the last shirt that says "CuCuy" (pronounce coo-coo-yeee) is the spanish word for a ghost in Hispanic culture. When I was a kid, my cousins and I were all afraid that the "CuCuy" was going to get us. This is my first attempt to use spanish on one of my onesies. Didn't know you were going to get spanish lessons today. Have a great week and I'm going to do this again next week. Hi there! I've been finishing up some orders and trying to get pictures together for you. I've been bad about updating this blog, but I'm trying. Things are crazy with trying to do the orders, working, and trying to look for another job and updating my resume. Such is my life. But that is not what you came for. Here are the latest birthday favors that I'm making for my friend's son. He's turning five and has been wanting a fire truck theme party forever. My friend saw some favors she liked and asked if I could re-create them. I played around on my computer and this is what I came up with. I was actually glad to do this project for my friend because it forced me to learn different techniques that could be used in Microsoft Word. I'm getting a lot better about incorporating computerized art in my crafts. I used the drawing features in Word (it's the tool bar on the bottom of the word screen). Prior to this project, I never knew what those button were for. It is amazing what we can learn from the internet just by doing a google search. I love the little ring of dots around the name. It was a pain in the but to center the name in the middle of the circle. I think I just gave up and moved the circles instead. The fire truck is from clip art. I think everything turned out well and I look forward to making more projects like this. Next month I was invited to the "For Love of Chocolate Festival" in Escondido on Feb 12th. I just love the name. I've been trying to make some new cards, favors, clothes, and projects for that event. Hopefully I remeber to take pictures of everything, so I can show you some of my new designs. Have a wonderful week and I hope to write more soon. Wish me luck at my job interview this Friday. I'm going to need it. Happy New Year's!!! I'm so sorry I've been MIA during December. Like everyone else I was running around like a crazy woman trying to get everything done in time for Christmas as well as try to sell stuff at the craft fairs. Hope you had a great Christmas. This year I made most of the gifts I gave this year. We've been on a budget crunch and trying to make ends meet, but I still wanted to give people gifts. But dummy me forgot to take pictures of the things I made before I gave them away. I'll just have to make them again, so I can show thme to you. I am super excited about this new project. I have to go to a baby shower this weekend for one of the girls at church. I didn't want to make a diaper cake or a pillow again, so I decided to do some research on the internet. Did you know that you could use your Cricut to cut material? It is so awesome and oh so easy. I had bought a bunch of remenant fabric from the thrift store and I was able to use that along with the fabric that I had left over from the last project to make this fabulous baby blanket. So here's how you cut material with your Cricut. You have to buy this stuff called Heat and Bond. You can pick it up from JoAnn's for less than $2.00 a yard. They usually sell it with the Pellon and web backing supplies. Take that home and this is where the magic happens. I used my Make the Cut Software for to determine the location of where to place the material on the mat. I cut the material to the size I needed for the project (in my case it was a 6x6 block of dark brown and a 6x6 block of the light tan I also had another material on there that didn't quite cut right, so I didn't use it). You are going to want to use a piece of light cotton material, as other materials don't cut very well and the fibers get caught in the razor blade. Take the material you cut and cut off a piece of the Heat and bond to the same size. Then you iron the tacky side of the heat and Bond to the back of your material. You iron on the paper side of the heat and bond for about 20 seconds. Make sure you are ironing on the paper side so you don't get the glue all over your iron. Do not remove the backing from the material yet (i tried it both ways and it cuts better with the backing left on). Take the prepared material and place it on your mat (paperside touching the mat). It's best to either use a newer mat or devote one mat specifically for fabric and spray it with tacky glue so it doesn't move around while it is cutting. I had the pressure settings on my Expression on High and the blade pressure at 6 and the speed on medium. I also had the multi-cut function on and set it to cut twice. Then you load the material into your Cricut paperside down and cut. When it's finished cutting remove the paper backing, center it on quilting block and iron it again. The Heat bond will stick to the material and you can leave it that way or you can embroider it over with your sewing machine. How cool is that. Here are the rest of the pictures of this project. I made the quilt, then I had some left over material so I made another pillow with the elephant. Then I decided to use one of the pillows I had made for a craft show and I added the giraffe. Once my friend has her baby, I told her I'll put the photo on the pillow to complete the project. I think she is going to love it. I had fun making it and am really excited about using this new technique in more of my crafts. Have a wonderful New Year and I hope to be here on a more regular basis. I'm busy looking for a new job, so no guarantees. But one of my resolutions is to at least get in here at least once or twice a week to post pictures of a new project. I look forward to hearing your comments and sharing my crafts with you this year. Enjoy 2011 and I pray that it will be filled with love, laughter, and joy of being with friends and family. Happy New Year!!! Hi there. Last week I went on Etsy and looked through the Alchemy listings to see if I could find any crafts that I could make for someone. I ran across this listing from this military family. The lady was looking for a pillow or a toy for someone to make for her daughter because both her and her husband are supposed to be deployed for a year. The listing just broke my heart. I didn't know exactly how to make her original request, but I e-mailed her and told her that I could make a photo pillow for the little girl free of charge. I also offered to make a pillow for her and her husband also free of charge because of all the sacrafices that their family was going to make on behalf of our country in the coming year. She was so grateful that I offered to do this. I asked her to e-mail me the picture. When she sent this picture I was so glad that I had committed to doing this. I didn't realize how young their daughter was. She looks like she is about a year and half or younger to me. No wonder the mom wanted me to put these taggies on it. I had no idea what she was talking about. I kept thinking she wanted dog tags sewn on the pillow. Apparently, there is a blanket called a Taggie for young kids. It is different textured ribbons with bright colors sewn around a blanket. Once I figured out what it was, I was able to make it with all the ribbon that I had around the house. I used some remenant fabrics that I found at JoAnn's for the rest of the pillow. I'm not that great of a seamstress, so I think this turned out rather good for my ability levels. I was just grateful that I could make this for their family. I hope that during their deployment they will find much comfort by seeing the picture of their family while they are homesick and start missing each other. If you have a chance, take the time to make a difference in the life of a complete stranger. Simple random acts of kindness have deeper impacts than you will ever know. I took these pictures before I finished sewing them to show the mom. I haven't uploaded the finished ones yet. Have a great day. Hi there. I did it. I finally designed some new onsies. I had so many stashed in my closet, I finally added a design to them and they are ready to go on the market. It was fun coming up with all the sayings for them. A friend and I had come up with the sayings on a slow day at one of the markets in the summer. It took me long enough to finally use them. I'm so glad I wrote them down, because I never would have remebered them. I used the Comic Sans Font on most of them. A few of the fonts were downloaded from a free fonts site. I think it was called urban fonts. I used the make the cuts software to create the design and the cricut to cut it out. I used heat transfer vinyl for the lettering and I had bought the onsies a long time ago. Make sure to cut out your image by using the mirror image key. It is so much easier to cut the sayings out with the make the cut software because it has the mirror image key. With the cricut cartridges, you have to think about writing the phrase out backwards and then hitting the reverse key. I'm going to try to sell these at the Lawrence Welks Farmers' Market today if it doesn't rain today. I have a feeling that the market is going to get cancelled. But I can still sell these online or at one of the other shows I'm doing this month. I'll be at the Killer Pizza From Mars in Oceanside on Nov 9th and Nov 23rd. They have a craft fair inside that pizza parlor every week. They use the booth fees to buy pizza and drinks for all the vendors and the visitors that visit all the craft booths. I committed to these 2 dates, but I don't know if I'll do it any more after that. There's also going to be a show in Carlsbad on State street on Nov 27th that I'll be selling at too. So if you're in the area, be sure to stop by and say hi. Here's the pictures. Enjoy. I hope you have a blessed week and remember that you can make a lasting impression through crafts. |
Archives
July 2016
Previous projects
All
Submit ExpressSearch Engine Marketing
Find Fairs Festivals and Craft Shows at FairsandFestivals.net - Comprehensive fair and festival calendar and resource for Craft Vendors, Art Vendors, Commerical Vendors, food Vendors and Music Vendors.
|